Retrieving Salesforce Metadata Using Visual Studio Code
Feb 28, 2025I spent 30 minutes in our Cloud Code Academy office hours last week helping a student who couldn't figure out how to pull Opportunity object metadata into their Visual Studio Code (VS Code) projects. The student’s complaint: "I need to create a trigger on Opportunity, but I can't see any of my custom fields in VS Code." This struggle is all too common among Salesforce learners fighting with metadata retrieval rather than building the functionality their work or assignments require.
Why You Must Keep Track of Your Changes, and What Happens if You Don’t
When you're working in complex Salesforce orgs with thousands of components, manually tracking changes becomes impossible. Obviously, you need a tool to assist you. And without proper metadata management, you inevitably court all of these Salesforce disasters:
- Your deployments fail with cryptic errors
- You accidentally overwrite critical customizations — both your own and your coworkers’
- Your code changes get lost between environments
- Your development velocity grinds to a halt
To avoid all of these pitfalls, I'll walk you through the exact processes I use to bring any Salesforce org's metadata into VS Code using a special file called a manifest. These methods gives you complete control over which components to retrieve while maintaining all critical dependencies.
Prerequisites
Before we dive into the technical steps, ensure that you have the Salesforce Command-Line Interface (CLI) installed and integrated with your VS Code installation. If you're missing these tools or don't have them configured correctly, check out my other videos that cover the installation and setup process for each of them.
Create a Project with Manifest
If you have the Salesforce CLI installed and correctly integrated, create a project using the following steps:
- Open Visual Studio Code and create a new project with manifest by pressing
Ctrl + Shift + Pand selecting the command SFDX: Create Project with Manifest.
- When prompted to name your project, name it something meaningful such as "Salesforce Mentor with Manifests."
Connect Your VS Code Project to the Desired Salesforce Org
To connect your project to the Salesforce instance from which you want to retrieve metadata, you must authorize your project to that org by doing an API login from VS Code to that org. To authorize your Salesforce org using VS Code, use the following steps:
- Click the text in the bottom left of the VS Code window that that says "No Default Org Set".
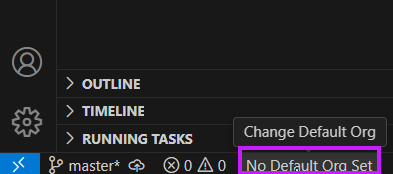
- Accept the selected SFDX: Authorize an Org command that opens in the command prompt.
- Accept Project Default if the org is a Production or Dev org and you wish to make it the default org for your project. If it is a Production or Dev org but you do not want to make it the default, select Production. Select Sandbox if the org is a Sandbox org. If the org has a custom URL (and cannot be logged into via the generic Salesforce login URLs), select Custom.
- Enter a brief alias name for the org.
- When your default web browser opens the Salesforce login page for the org, authenticate in the normal manner to the org.
- At the conclusion of a successful authorization, you should see a message in VS Code that confirms you have authorized the connection to the org successfully.
VS Code automatically connects to the org to which the project was last successfully authorized. If that org is not the org in which you wish to work at this time, but you have previously authorized the org you wish to work in, select the desired org for pulling metadata to switch to that org.
Note: If you haven't configured your VS Code to use the correct Java version on your PC, you might see a Java error. No worries! I have a Salesforce Developer 101 course that can help you fix this.
Retrieving Default Metadata Types with the Manifest File (Package.xml)
After creating your project, you’ll notice that VS Code created several files. Navigate to the manifest folder and open it to view the manifest file within it named package.xml. The manifest file plays a crucial role in managing metadata. It lists either the specific metadata files or entire metadata categories (types) that you are retrieving from or deploying to your Salesforce org via the Metadata API.
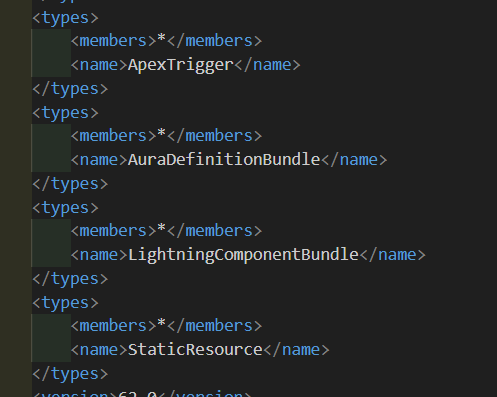
By default, the automatically created manifest that VS Code creates for you only lists those metadata types most likely to be of interest to a developer, including the following:
- Apex Classes
- Apex Pages (Visualforce Pages)
- Lightning Component Bundles (Lightning Web Components)
- Static Resources
Retrieving metadata in VS Code from an authorized Salesforce org using a manifest is as simple as right-click package.xml and select SDFX: Retrieve Source with Manifest from Org. 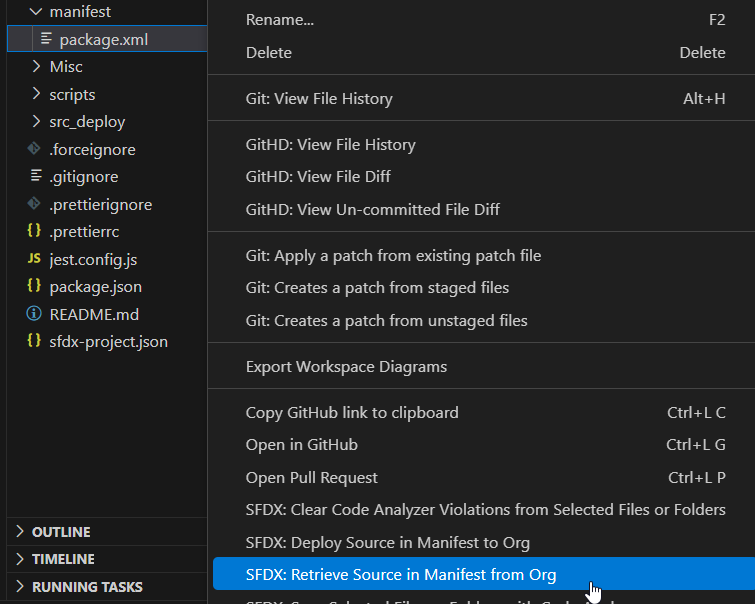
Customizing the Manifest to Your Needs
If you want to include more metadata types like Custom Objects or Tabs, manually edit your manifest file in VS Code. Add the necessary metadata types, making sure to include all of the proper XML tags by following the established pattern.
Once you have finished editing, save the package.xml file in VS Code and once again retrieve the source from the org using the same command as before.
After VS Code indicates the retrieval has finished, check the VS Code project's force-app\main\default subfolders for the newly retrieved metadata. VS Code will add new subfolders to accommodate any new types and will expand existing subfolders as needed. For example, if you added the metadata type "Flow" (note the singular form), VS Code adds the subfolder flows to hold the retrieved metadata of that type.

If you only wish to retrieve specific metadata files (such as a single Apex class or a single Lightning Web Component), adjust the content of the manifest file accordingly. Remove the asterisks, which are wildcards standing for "All of a given type of metadata", and enter the names of specific metadata items instead. Then save and rerun the retrieval process to retrieve only the specific metadata items you entered. For example, if you decided to retrieve a flow called "Customer_Satisfaction", retrieving that flow adds the single metadata file customer_satisfaction.flow-meta.xml to the subfolder flow in your VS Code project.
Generating an All-Inclusive Manifest File
For a comprehensive metadata retrieval, use a command to generate an all-inclusive manifest file. This method is especially advantageous for automated processes or workflows, as it consolidates all metadata types into one file. You can specify this with additional parameters, and your new manifest will be generated automatically.
Wrap Up
Retrieving Salesforce metadata using manifest files in VS Code is a powerful strategy for Salesforce developers. There are alternative methods available through the Salesforce CLI to pull information directly, however. For more information on these retrieval methods, check out my dedicated video on the topic, available on my YouTube channel.
Thank you for joining me in this tutorial. As always, like and subscribe for more tips and guides. Remember, I believe in you and your ability to wield the power of Salesforce with confidence!
References
Stay connected with news and updates!
Join our mailing list to receive the latest news and updates from our team.
Don't worry, your information will not be shared.
We hate SPAM. We will never sell your information, for any reason.
